How to Use Fermentation with Floating Lid for Best Results?
Fermentation with floating lid is an intriguing method that can enhance your fermentation results. This technique not only promotes better oxygen control but also reduces the risk of contamination. The floating lid acts as a barrier, making it easier to maintain ideal fermentation conditions.
Utilizing this method can lead to more consistent flavors in your products. However, it's important to monitor the process closely. Sometimes, the lid can create an environment that traps gases too effectively, possibly leading to uneven fermentation. You must find that balance to achieve optimal results.
Understanding the science behind fermentation is crucial. Each strain of yeast or bacteria behaves differently. Therefore, experience plays a key role in refining your technique. While the floating lid offers advantages, it also requires attention and adjustments based on your specific environment. Embrace the learning curve and enjoy the journey of perfecting fermentation with floating lid.
Understanding Fermentation and Its Benefits
Fermentation is a natural process for transforming food. This technique not only preserves food but also enhances its nutritional value. Fermented foods are rich in probiotics, which benefit gut health. Consuming these foods may improve digestion and boost the immune system. The process requires patience and careful monitoring to achieve the best results.
Using a floating lid can optimize fermentation. This method allows some gases to escape while preventing contaminants from entering. It creates a balanced environment where beneficial microbes thrive. However, it's essential to monitor the fermentation regularly. Over-fermentation can lead to off-flavors. It can also cause spoilage, resulting in wasted ingredients.
Fermentation offers many benefits but also requires practice. Each batch may turn out differently due to environmental factors. Temperature, humidity, and the quality of ingredients all play a role. Small adjustments can make a big difference. Experimenting with this process can be rewarding, leading to unique flavors and textures. However, learning from mistakes is crucial in mastering fermentation.
How to Use Fermentation with Floating Lid for Best Results?
| Fermentation Type | Optimal Temperature (°C) | Fermentation Time (Days) | Benefits |
| Vegetable Fermentation | 15-20 | 3-14 | Improved digestion, enhanced flavor |
| Fruit Fermentation | 20-25 | 1-7 | Natural sweetness, preservation |
| Dairy Fermentation | 20-30 | 1-14 | Probiotics, enhanced texture |
| Grain Fermentation | 25-30 | 2-10 | Increased nutrient availability, better digestibility |
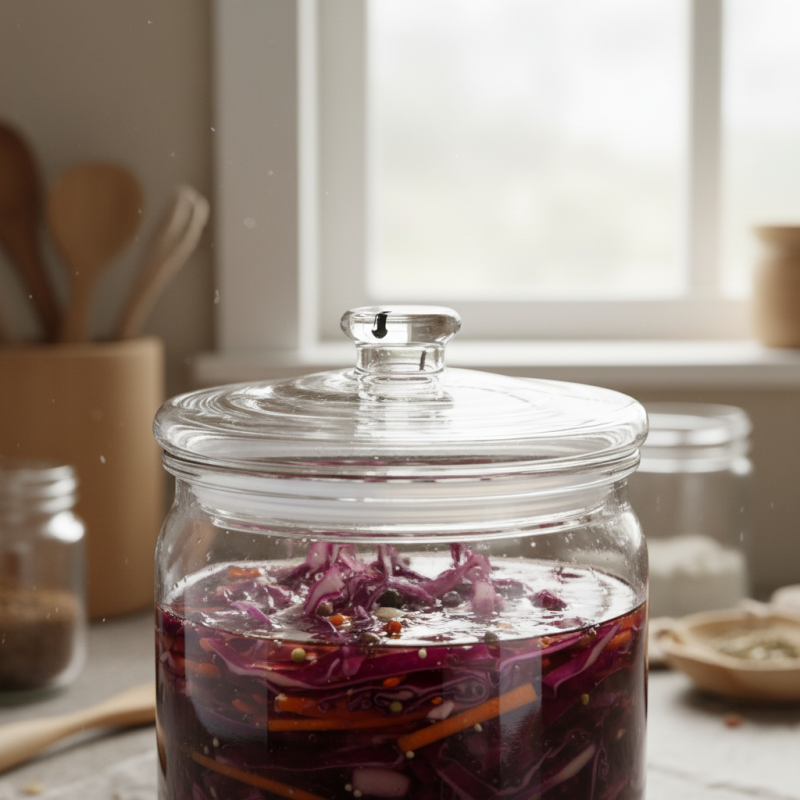
The Role of Floating Lids in Fermentation
Floating lids play a crucial role in fermentation. They help in controlling the environment during the process. A well-designed floating lid can create an anaerobic condition. This is essential for the growth of specific yeast and bacteria, which thrive without oxygen. Studies show that optimal fermentation can increase product yield by up to 30%.
Floating lids also facilitate evaporation and gas release. They help maintain a consistent temperature, which is vital for fermentation. Temperatures that fluctuate can disrupt the process. Data from fermentation research indicates that a stable temperature range significantly enhances flavor development. Variations can lead to off-flavors or unwanted byproducts.
However, using floating lids isn’t foolproof. Sometimes, lids can create too tight a seal. This prevents the necessary gas exchange required for some fermentation processes. Operators must balance sealing with ventilation to ensure quality results. Regular monitoring and adjustments are necessary. Understanding the dynamics at play can improve outcomes and reduce inconsistencies.
Step-by-Step Guide to Setting Up Fermentation with Floating Lids
Setting up fermentation with a floating lid requires attention to detail. The floating lid method can enhance the fermentation process. It minimizes oxygen exposure while providing an effective seal. This creates an anaerobic environment crucial for certain fermentation types. According to a study from the Institute of Food Technologists, controlled oxygen levels can improve flavor development by 30%.
To begin, prepare your fermentation vessel and ensure it's clean. A glass or food-grade plastic container works best. Fill it with your chosen ingredients. Then, place the floating lid carefully on top. This lid should sit loosely to allow gases to escape without compromising the seal. Many home fermenters overlook the importance of maintaining consistency in temperature. Aim for a range between 65°F and 75°F. Fluctuations may lead to unpredictable results.
Monitoring your fermentation closely is essential. Look for signs such as bubbling or a change in aroma. When using a floating lid, sediment consistency can sometimes be uneven. This may require adjusting your process or ingredients. While floating lids offer benefits, not every batch will yield perfect results. Reflect on each attempt to improve future batches, ensuring a deeper understanding of the fermentation process.
Fermentation Process Data Comparison
This bar chart illustrates the CO2 production during the fermentation process over a week, showcasing the peak activity on Day 4, which is critical for optimal fermentation results.
Common Mistakes to Avoid During Fermentation
When using fermentation with a floating lid, avoiding common mistakes is crucial. One major error is improper temperature control. Fermentation thrives in specific temperature ranges. Studies show that optimal fermentation occurs between 60°F and 75°F (15°C to 24°C). Temperatures outside this range can lead to undesirable bacteria growth. A sudden spike or drop can ruin your batch, leading to spoilage.
Ignoring the importance of sanitation is another mistake. The environment must be clean to prevent contamination. The National Center for Home Food Preservation emphasizes that any residue can introduce harmful bacteria. All equipment should be sanitized carefully. Even a small oversight can compromise the entire process, resulting in a failed fermentation.
Misestimating the time needed for fermentation is common as well. Each type of fermentation, whether it’s for vegetables or beverages, has its own time requirements. Data from fermentation studies indicate that many beginners rush the process. This often leads to off-flavors and subpar results. Patience is critical; checking regularly without interrupting the environment is advised.
Best Practices for Monitoring and Maintaining Fermentation Conditions
Monitoring and maintaining fermentation conditions is crucial for optimal results. The ideal temperature range for fermentation typically lies between 18 to 26 degrees Celsius. This temperature supports yeast activity and the production of desirable flavors. In practice, fluctuations can occur, sometimes disrupting the process. Using a thermometer can help keep things stable. However, it’s essential to recognize that slight variations can lead to different flavor profiles.
Humidity also plays a role in fermentation. Studies show that maintaining humidity levels around 70% can prevent unwanted spoilage. If the environment is too dry, certain microorganisms may thrive, leading to off-flavors. A hygrometer can track these levels, ensuring a conducive environment. Sometimes, achieving balance requires adjustments, highlighting the trial-and-error aspect of fermentation.
Monitoring pH levels is another essential factor. Ideal fermentation happens around a pH of 4.0 to 4.5, resulting in optimal flavor development. Changes in pH can influence yeast health and fermentative efficiency. Some brewers may experience difficulties in stabilizing these levels. Regular testing and analysis can guide necessary modifications, reflecting the importance of diligence in the fermentation process.
